Live From Snack Time by Brianna F
Share
I am excited to share this card concept that I have been thinking of for quite some time and decided to give all of the ideas clashing around in my head a try. It is an original idea, well, probably not too original as I am sure it has been done before. It is just one I have never actually seen be demonstrated, so I am patting myself on the back for giving it a try without any guidance whatsoever!
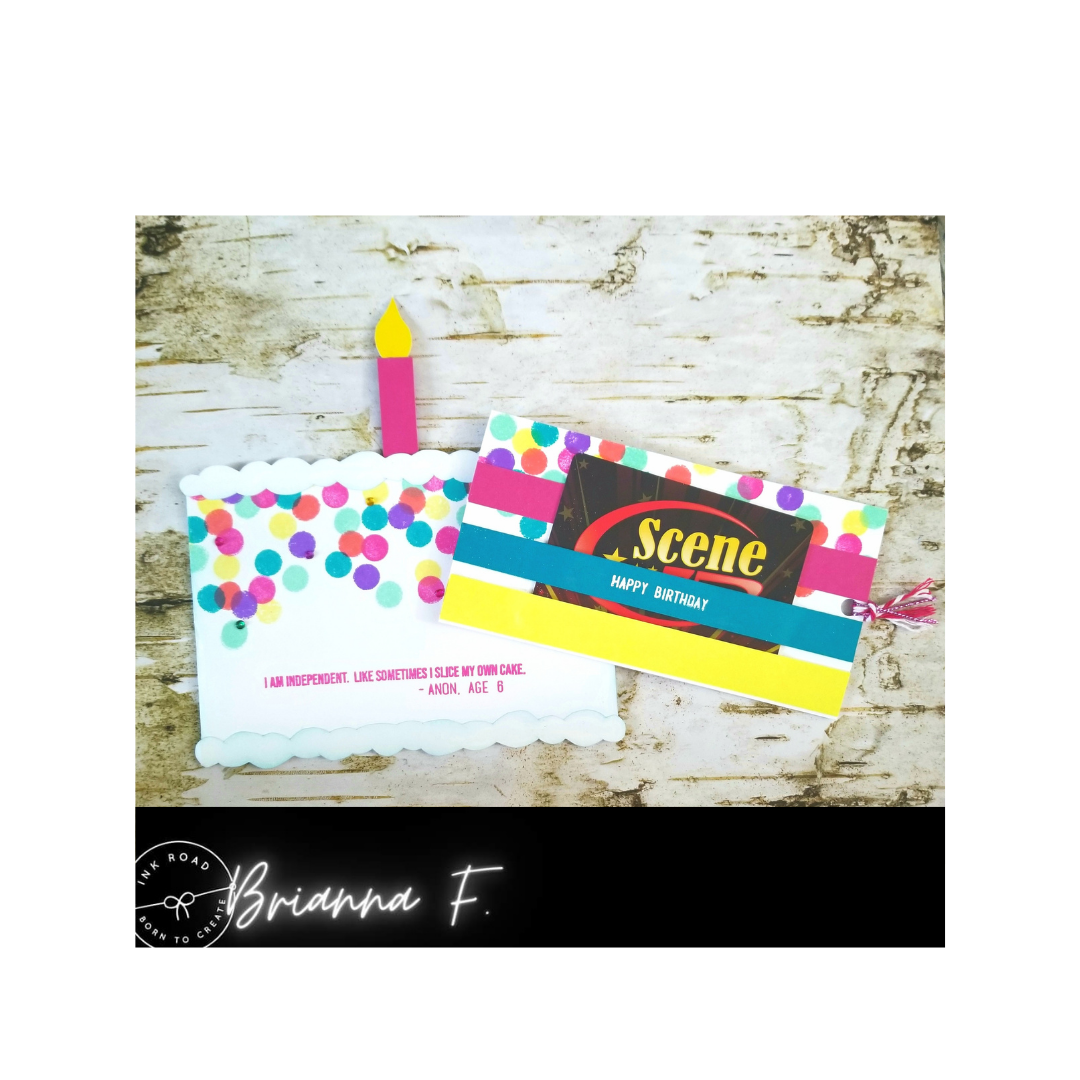
Today I have made a birthday cake gift card holder. When the gift card holder itself is pulled outside of the cake it reveals a piece of the cake holding a gift card! I just love this idea and it could work with so many different cake designs!
First I cut a heavy piece of card stock with the dimensions of 11”x3¾”. I scored the exact center of the rectangle at 5.5”. Before adhering the top and the bottom, I used a 1” circle die and centered it at one end of the short sides. Of course this can also be done with anything around the same size to trace and then cut with scissors. This provides a space that allows the “slice of cake” to be pulled out easily to reveal the gift card. My next step was to fold on my score line, reinforcing with my bone folder and using double stick adhesive on the top and the bottom to create a pocket.

I do not have any small cloud-like dies so I simply drew a long thin cloud-like figure the same length as my cake. I fussy cut this and then traced it to get two of the same figures and once again fussy cut these as well. Then, I used a very light blue dye ink to lightly brush around the edges of my cloud puffs which now I will refer to as frosting...and also brushed around each of the four sides of the 5.5”x3 ¾” pocket card front. I decided to use the back of an unused pencil eraser as a stamp for polka dots in various bright color inks. I used a coordinating ink to stamp the most adorable quote from Live From Snack Time stamp set.

And, what is a birthday cake without a candle?! I decided to cut another piece of heavy white card stock with the same dimensions as the cake itself and use it to sandwich my candle on the back of the card. I decided to draw my candle and candle flame since I do not own any candle stamps or dies. To make it more stable I cut two of the long pink rectangles and sandwiched the flame in-between using liquid adhesive.
For the gift card “slice of cake” I used the same white heavy card stock and cut the dimensions of 5.5”x2 ¾”. Just like on the front in a similar random pattern I used the back of the pencil eraser and stamped polka dots to simulate sprinkles again. To show the “layers” of the cake, as well as hold the gift card in place, I used coordinating card stock and cut strips with the dimensions of 5.5”x1/2”. To the top layer (strip) I used liquid adhesive and glued the entire strip onto the slice of cake. For the bottom layer (strip) I traced the bottom of the gift card on the back of the yellow layer (strip) to give it a comfy spot that it would fit in once the yellow strip was adhered. I used my guide and put liquid adhesive in the spot that I wanted to stick to the slice of cake. Finally, for the middle layer (strip), I traced each side of the length of the gift card onto the back of the strip and using liquid adhesive I went slightly outside of my lines and added the adhesive so as to only glue down either side of the strip allowing the gift card to slide through and into the bottom layer pocket already created. A simple “Happy Birthday” from the stamp set Basics: Sentiment Strips-Separated was all that was needed on the middle layer strip. I decided to emboss using white embossing powder. First, I prepped the area using my anti-static bag and then stamped the sentiment with Versamark ink and covered in white embossing powder and set with my heat gun. My last step was to use a hole punch in the center of the end that will stick out of the cake and then tie some coordinating ribbon.

And, finally, for good measure I decided to add some bling to the front using coordinating flat backed gems. Because, let's be real..everything needs some bling!

Thanks for hanging in there til' the end! Hopefully I was able to put my idea into words simple enough to try it out! Have a great day!
Also! Come on over to the Ink Road Stamps shop and use the discount code BriannaF10 on any order!